
Monday, July 18, 2016

Friday, July 15, 2016
Dell rack servers - Upgrade firmware using Dell repository manager
I had to recently perform some firmware upgrades for customer on their Dell R710 and R730xd servers. As you all know there are multiple ways to successfully upgrade the firmware and I want to touch on the upgrade through bootable virtual cd, optical cd or USB since this was the only method available to me at the time.
Firmware upgrade methods available:
- Upgrade using bootable linux iso
- Upgrade using server update utility(SSU) iso/folder with Dell lifecycle controller
- Upgrade using Dell FTP Site with lifecycle controller
All of these methods have some great information out there on Dell website as well as blogs but I wanted to just go through my steps using bootable linux iso and primarily how to create it that ISO.
My preferred method is using the Dell FTP site with the lifecycle controller but this not always possible especially if you have trunked ports and have to specify a VLAN (in later iDRAC firmware it is now possible to specify a VLAN!)
The reason why the FTP site method is better in my opinion is because the firmware comparison is done upfront and only the necessary firmware is downloaded for component that are outdate. This decrease the firmware upgrade process considerably compared to the bootable iso that compares everything single component.(this only when you use the bundle, which I do in most instance since who wants to go manually through every single component and check which is required for your server:)
Steps:
Thursday, June 2, 2016
Dang our sun is big and awesome!
4K video just got released of Mercury passing by the sun. Amazing!
https://svs.gsfc.nasa.gov/cgi-bin/details.cgi?aid=4462
https://svs.gsfc.nasa.gov/cgi-bin/details.cgi?aid=4462
Thursday, May 26, 2016
vCSA & PSC: Update/Patching options available
The update of either vCSA or PSC can be achieved through the VAMI interface which was introduced back in 6.0U1 or through the appliancesh command-line interface.
Method 1: VAMI and URL:
This method requires internet access from your appliances.
- Login to VAMI
- https://vcenterserver.domain.com:5480/
- U: root / P: password
- From navigator select Update
- This will display the current version details

- Select Check Updates -> Check URL
- This method will go out to VMware's repository https://vapp-updates.vmware.com/vai-catalog/valm/... and verify you are on latest.
- If available updates then select the Install updates -> Install all updates
- Accept EULA
- Wait for updates to complete.

Method 2: VAMI and custom URL:
This method can be used if you do not have internet access from your appliances by setting up a local repository.
- Setup a webserver on your network (ISS or Apache) that will be accessible to the vCSA and PSC.
- Create a directory called PSC_updates or VCSA updates. Names can be changed.
- On VMware support site now download update but make sure to download the zip update bundle.
- Extract the zip update bundle to the folder you created earlier.
- Login to VAMI
- https://vcenterserver.domain.com:5480
- U: root / P: password
- From navigator select Settings
- Select "Use specified repository"

- Click OK
- Select Check for updates
- If available updates then select the Install updates -> Install all update
- Accept EULA
- Wait for updates to complete

Method 3: VAMI and CDROM:
This method is pretty straight forward.
- On VMware support site download the ISO for latest vCSA and/or PSC.
- Login to vCenter Web client
- Select vCSA or PSC appliance VM
- Launch remote console
- Select VMRC -> Removable devices -> CD/DVD drive 1 -> Connect to Disk Image File (iso)
- Mount the ISO downloaded from VMware support site
- Login to VAMI
- https://vcenterserver.domain.com:5480/
- U: root / P: password
- From navigator select Update
- Select Check Updates
- Select Check CDROM
- If available updates then select the Install updates -> Install all update
- Accept EULA
- Wait for updates to complete
Method 4: Using appliancesh command line
This method was the only way to update the appliance when vCenter 6 was released since the VAMI was only introduced in 6.0U1. You can either mount and ISO or point to a URL for updates. The URL can be the default VMware or
- On VMware support site download the ISO for latest vCSA and/or PSC.
- Select vCSA or PSC appliance VM
- Launch remote console
- Select VMRC -> Removable devices -> CD/DVD drive 1 -> Connect to Disk Image File (iso)
- Mount the ISO downloaded from VMware support site
- SSH to VCSA or PSC
- type # appliancesh
- enter root password
- To use CDROM
- type # software-packages install --iso --acceptEulas
- To use default VMware URL
- type # software-packages --url (This will use the default vmware URL to check)
- to use local ropository URL
- type # software-packages --url https://web.domain.com/VCSA_update/
Product patches can be downloaded from this VMware site:
https://my.vmware.com/group/vmware/patch#search
Log files to review for updates:
/var/log/vmware/applmgmt/software-packages.logWednesday, May 25, 2016
vRealize Log Insight: Configuring agents
The vSphere content
pack provides powerful insight into your vSphere logs, allowing you to make
informed and proactive decisions within your environment. For the exercise I am just reviewing some of the VMware products and providing notes I took during installation. Sorry if they seems a bit all over the place :)
Log Insight agent now gets pre-installed on some of the appliances which is great and means no need to install agents manually. Some of the VMware products that has agent pre-installed:
vRealize Business
vRealize Operations Manager (beginning from 6.1)
vRealize Orchestrator (beginning from 7.0.1)
vRealize Automation (beginning from 7.0.1)
vRealize Log Insight
Here are some basic functions which will help a lot for instructions on content packs:
Install Content Packs:
Login to vRealize Log insight.
Select the stack menu button in top right hand corner
Select Content Packs
Installation has been simplified a lot since you do not have to go to VMware solution exchange anymore to download and manually install the content packs, it is available straight from Marketplace window. Super awesome!
Just click on Install for which ever content pack you want to install.
vRealize Orchestrator control center : HTTP Status 500 Failed to edit Log insight configuration file
With latest vRealize Orchestrator 7.0.1 I was configuring syslog logging integration in control center, to send logs to vRealize Log insight, but ran into error "HTTP Status 500 Failed to edit Log insight configuration file".
Troubleshooting:
Testing on a fresh install and did no run into the problem so came to the conclusion that this error only appears when you upgrade from 7.0 to 7.0.1
SSH into Orchestrator appliance and reviewed the logs.
/etc/var/log/messages
Troubleshooting:
Testing on a fresh install and did no run into the problem so came to the conclusion that this error only appears when you upgrade from 7.0 to 7.0.1
SSH into Orchestrator appliance and reviewed the logs.
/etc/var/log/messages
2016-04-27T17:19:32.013813+00:00 ldvro01 sudo: vco : a password is required ; TTY=unknown ; PWD=/var/lib/vco/configuration/bin ; USER=root ; COMMAND=/var/lib/vco/app-server /../configuration/bin/config_liagent.sh /var/lib/vco/configuration/temp/liagent.tmp /var/lib/loginsight-agent/liagent.ini
2016-04-27T17:20:10.075308+00:00 ldvro01 sshd[20887]: rexec line 79: Unsupported option KerberosAuthentication
2016-04-27T17:20:10.075376+00:00 ldvro01 sshd[20887]: rexec line 85: Unsupported option GSSAPIAuthentication
Found the script that gets executed to be /var/lib/vco/configuration/bin/config_liagent.sh which actually resides on /usr/lib/vco/configuration/bin/config_liagent.sh
Listing the folder shows that vco:vco has rwx permission.
:/usr/lib/vco/configuration/bin # ls -ll
-rwx------ 1 vco vco 218 Feb 19 15:09 config_liagent.sh
-rwx------ 1 vco vco 230 Feb 19 15:09 controlcenter.sh
-rw-r--r-- 1 vco vco 6718 Feb 19 15:09 log4j.dtd
-rw-r--r-- 1 vco vco 3315 Feb 19 15:09 propagate.sh
-rwx------ 1 vco vco 1321 Feb 19 15:09 setenv.sh
A password is required is throw in the error message which leads me to think the vco user does not have the necessary permissions when trying to execute the command.
Looking in /etc/sudoers file and found the vco missing the path to the config_liagent.sh file.
Resolution:
Add the path to config_liagent.sh for vco user.
# visudo
scroll to bottom of file.
you will see the following:
vco ALL=(root) NOPASSWD: /etc/init.d/vco-server, /etc/init.d/vco-configurator
update the line as follows:
vco ALL=(root) NOPASSWD: /etc/init.d/vco-server, /etc/init.d/vco-configurator, /var/lib/vco/configuration/bin/config_liagent.sh
EMC UnityVSA with SRM configuration
I am not going to get into the details of setting up SRM and ECM Unity this is very well documented so the information I will provide is after SRM is installed and configured on vCenter and EMC Unity is installed and configured.
Previous blog post shows UnityVSA setup:
https://virtualrealization.blogspot.com/2016/05/how-to-emc-unityvsa-installation-and.html
EMC UnityVSA:
I already have my pools and LUN's configured on both Unity virtual storage appliances.
Firstly we want to setup an interface for replication on both Unity VSA's.
In Unisphere select Data protection -> Replication
Select Interfaces
Click + sign
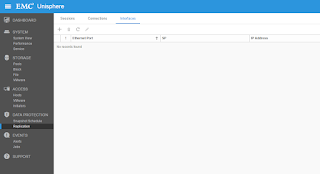
Select Ethernet Port and provide IP address information.
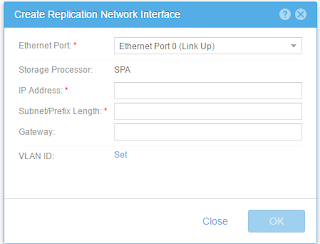
click OK
Now lets configure the remote connections between Unity arrays.
In Unisphere select Data protection -> Replication
Select Connections
Click + sign
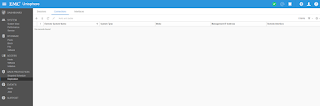
Enter Replication connection information for your remote Unity VSA.
Asynchronous is the only supported method for the Unity VSA.
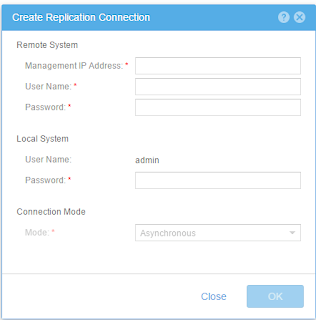
Click OK.
Select the remote system and click "Verify and Update" to make sure everything is working correctly.
Previous blog post shows UnityVSA setup:
https://virtualrealization.blogspot.com/2016/05/how-to-emc-unityvsa-installation-and.html
EMC UnityVSA:
I already have my pools and LUN's configured on both Unity virtual storage appliances.
Firstly we want to setup an interface for replication on both Unity VSA's.
In Unisphere select Data protection -> Replication
Select Interfaces
Click + sign

Select Ethernet Port and provide IP address information.

click OK
Now lets configure the remote connections between Unity arrays.
In Unisphere select Data protection -> Replication
Select Connections
Click + sign

Enter Replication connection information for your remote Unity VSA.
Asynchronous is the only supported method for the Unity VSA.

Click OK.
Select the remote system and click "Verify and Update" to make sure everything is working correctly.
EMC UnityVSA : adding LDAP authentication
Here are the steps to setup LDAP authentication for EMC UnityVSA.
Login to Unisphere.
Select the cog in top right hand corner to open settings.
Select Users and Groups -> Directory Services
Enter LDAP server information
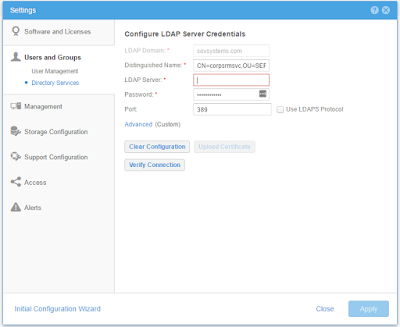
Click Apply
Click Verify Connection
If successful, Select Advanced
This is recommended since otherwise you will run into problems with assigned users and groups since a default user and group search path created for domain is "cn=Users,dc=domain,dc=com" which in most cases will not fit in your company's AD structure.
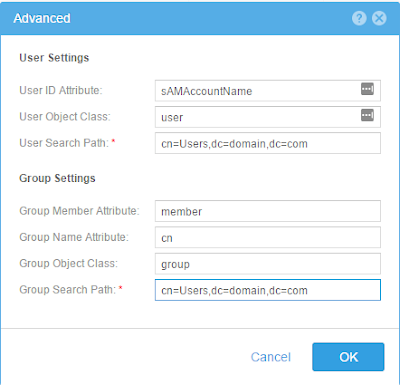
Click Ok
Click Apply
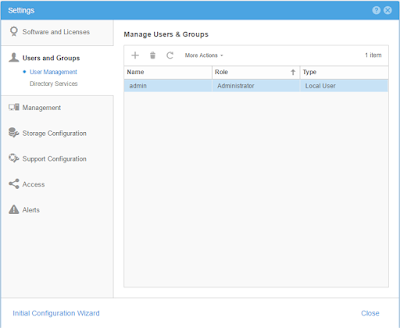
Select Users and Groups -> User management
Click + Sign
Select User or Group type
Select LDAP User
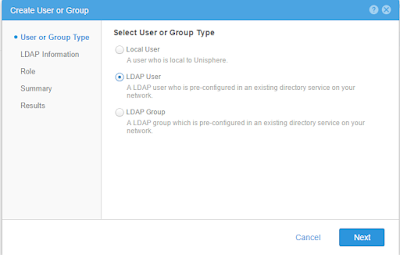
Enter username. Wish validation could have taken place for LDAP user or group at this point and not after entering all information.
Enter role
Click Finish
Login to Unisphere.
Select the cog in top right hand corner to open settings.
Select Users and Groups -> Directory Services
Enter LDAP server information

Click Apply
Click Verify Connection
If successful, Select Advanced
This is recommended since otherwise you will run into problems with assigned users and groups since a default user and group search path created for domain is "cn=Users,dc=domain,dc=com" which in most cases will not fit in your company's AD structure.

Click Ok
Click Apply
Select Users and Groups -> User management
Click + Sign

Select User or Group type
Select LDAP User

Enter username. Wish validation could have taken place for LDAP user or group at this point and not after entering all information.
Enter role
Click Finish
Tuesday, May 24, 2016
EMC UnityVSA installation and configuration
I am currently testing SRM and installed Nimble as my virtual storage array with Nimble SRA 3.0 but having to many problems with getting the array pairs working correct so decided to setup UnityVSA community addition which is available for free with up to 4TB of data. At the bottom of the page I provided some useful links:
Installation:
first off lets review requirements:






Installation:
first off lets review requirements:
- vCenter 5.5 update and later.
- ESXi 5.x and later
- 12GB Memory
- 2 vCPU
Deploy the OVA downloaded "UnityVSA-4.0.0.7329527.ova".
I am not going to provide the steps to deploy and OVA since this is pretty straight forward and nothing really to configure except for management and data ports and management IP address.
After deployment is completed and VM powered on, open a browser and point to IP address specified during OVF deployment.
You will be presented with a login screen.
Type admin / Password123#
Wizard will appear for initial configuration.


Specify password to replace the default.
You need to request the license file by providing the System UUID to the following website:
Download the license file and install it.


Enter DNS information

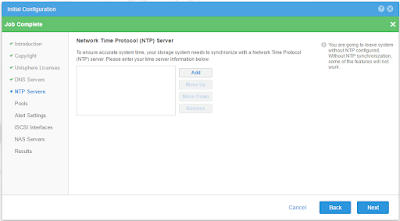
Enter NTP information

Pools can be configured here but you do you require a manually created VM disk. If you have not added the new disk within vCenter for the VM then I would recommend just skipping this step for now.

Enter SMTP information

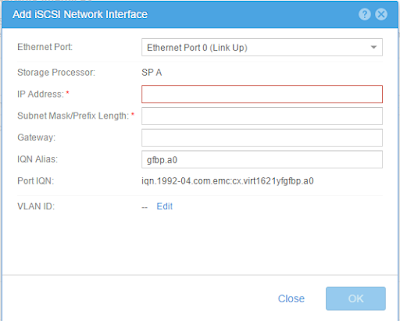
Create iSCSI network interface.
This can also be performed later but I created this on the data network ports i specified during the OVF deployment.


Creating NAS server but this can be done at later time.


Initial setup is now completed, yay!
Thursday, May 5, 2016
vCenter Server SMTP authentication not supported - how to guide on getting alerts
I recently updated a customer from 5.1 to 6.0 and a couple of days later received a question on how to setup a mail server with SMTP authentication.
This of course is not possible as described in the following KB 2063147
https://kb.vmware.com/selfservice/microsites/search.do?language=en_US&cmd=displayKC&externalId=2063147
This got me interested to setup a solution that would provide the functionality to allow outgoing email through SMTP relay service in stead of setting up a full fledged local email server.
Here are the steps I took to setup postfix on CentOS to relay outgoing email to 3de party which requires authentication.
This of course is not possible as described in the following KB 2063147
https://kb.vmware.com/selfservice/microsites/search.do?language=en_US&cmd=displayKC&externalId=2063147
This got me interested to setup a solution that would provide the functionality to allow outgoing email through SMTP relay service in stead of setting up a full fledged local email server.
Here are the steps I took to setup postfix on CentOS to relay outgoing email to 3de party which requires authentication.
- Install and configured a linux operating systems.
- Now we need to install and update the packages required for our configuration which includes postfix as well as cyrus-sasl-plain which is not installed by default on CentOS 6+
- sudo yum install postfix cyrus-sasl cyrus-sasl-plain
- To make postfix the default MTA in our system lets remove sendmail
- sudo yum remove sendmail
- Postfix setup:
- vi /etc/postfix/main.cf
- Configure server FQDN:
- mydomain = <domain.com>
- myhostname = <postfixservername.domain.com>
- Configure relayhost to email provide smtp server. Verify the port since might not be default 25 to prevent spamming.
- relayhost = <yourisp.smtp.com:2525>
- relaydomain = <domain.com>
- Configure cyrus-sasl-plain:
- smtpd_sasl_auth_enable = yes
- smtpd_sasl_path = smtpd
- stmpd_sasl_password_maps = hash:/etc/postfix/sasl_passwd
- smtpd_sasl_type = cyrus
- smtp_sasl_auth_enable = yes
- Configure receive mail so that communication can be established from all networks. If you select inet_interfaces = localhost then can only send from local server.
- inet_interfaces = all
- inet_protocols = all
- Configure additional trust and relay control
- mynetworks_style = subnet (if you want to specify specific network subnets)
- mynetworks_style = host (if you want to specify specific host names)
- mynetworks = 127.0.0.0/8, 192.168.1.0/24
- Now since our SMTP server requires authentication we need to setup username and password.
- vi /etc/postfix/sasl_passwd
- yourisp.smtp.com:2525 username:password
- the servername should match exactly what you have entered for relayhost in /etc/postfix/main.cf
- Generate a postfix lookup table
- postmap hash:/etc/postfix/sasl_passwd
- Test lookup table which should return username and password
- postmap -q yourisp.smtp.com:2525 /etc/postfix/sasl_passwd
- Verify sasl_passwd and sasl_passwd.db files are read/write enabled for root only to protect the plain text password.
- chmod 600 /etc/postfix/sasl_passwd /etc/postfix/sasl_passwd.db
- Add postfix to be started at boot
- chkconfig --add postfix
- start service
- /etc/init.d/postfix start
- Send test email.
- # sendmail -t
- TO: addressto@test.com
- From: addressfrom@test.com
- Subject: Test
- Did you get this email?
- .
Troubleshooting:
If you check the status of service and get error: "Master is Dead ButPid File Exists", verify that you have removed sendmail successfully.
Connection refused when trying to send from vCenter, verify that port 25 is listening on host with # netstat -nlp | grep 25. If it shows with 127.0.0.0/8 then it will only allow local connection. This needs to show 0.0.0.0:25 so make sure you have inet_interfaces = all.
Some useful links:
Subscribe to:
Posts (Atom)