Previous blog post shows UnityVSA setup:
https://virtualrealization.blogspot.com/2016/05/how-to-emc-unityvsa-installation-and.html
EMC UnityVSA:
I already have my pools and LUN's configured on both Unity virtual storage appliances.
Firstly we want to setup an interface for replication on both Unity VSA's.
In Unisphere select Data protection -> Replication
Select Interfaces
Click + sign

Select Ethernet Port and provide IP address information.

click OK
Now lets configure the remote connections between Unity arrays.
In Unisphere select Data protection -> Replication
Select Connections
Click + sign

Enter Replication connection information for your remote Unity VSA.
Asynchronous is the only supported method for the Unity VSA.

Click OK.
Select the remote system and click "Verify and Update" to make sure everything is working correctly.
Now lets go ahead and setup the Consistency groups.
In Unisphere select Storage -> Block
Select Consistency Groups
Click + sign

Provide name

Configure your LUN's. You have to create a minimum on 1 LUN but you can later add your existing LUN's to this consistency group if that is required.

Click + to Configure access

Add initiators

Create Snapshot schedule

Specify replication mode and RPO
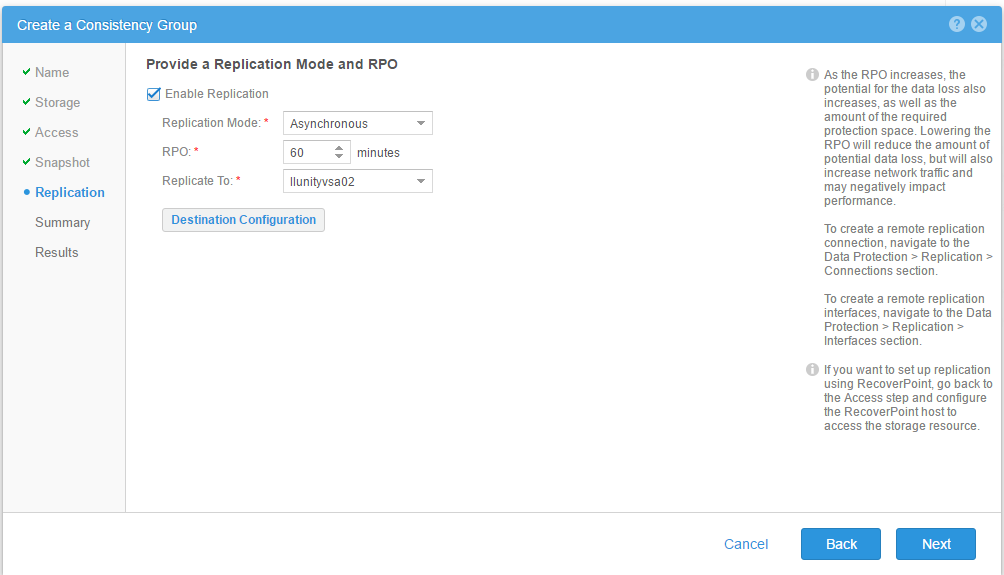
Specify destination

Click Finish


Now that we have replication configured we can go to vCenter and configure SRM.
SRM:
I already have my EMC Unity Block SRA installed on my SRM server. My mappings is also configured within each site so we will skip this.
Open vCenter server and select Site recovery.
Select each site -> Monitor -> SRA's
Select rescan all SRA's
Verify that EMC Unity Block SRA is available.

Let's configure Array Base Replication.
Select Site recovery
Select Inventories -> Double click Array Base Replication
Select "Add array manager"
On popup wizard select "Add a pair or array managers"

Select location

Select Storage replication adapter, EMC Unity Block SRA

Configure Array manager

Configure array manager pair for secondary site.
Enable the pairs

Click Finish

Verify Status is OK

Click on each storage array and verify no errors and that you can see the local devices being replicated.

Now we can setup the protection group
Select Site recovery
Select Inventories -> Protection Groups
Select "Create Protection group"
Enter name

Select protection group direction and type. For this we will select array base replication with datastore groups.

Select datastore groups

This will provide information on the VM's which will be protected.

Click Finish
Verify protection status is OK

Finally you can configured your Replication plan:
Select Site recovery
Select Inventories -> Recovery Plans
Select "Create Recovery plan"
Enter name

Select recovery site
Select protection group

Select network to be used for running tests of the plan.
Click Finish
You can now test your recovery plan.
No comments:
Post a Comment