NOTICE: NEW BLOGGING SITE
I have made the decision to sunset my google blogger webpage and have moved over to Wordpress. I know shocking :)
I will not be posting any new blogs on this site but please check out my new site where I will delivering more content in the future.
www.johannstander.com
Monday, August 22, 2016
Sunday, August 21, 2016
VSAN : Migrate VSAN cluster from vSS to vDS
How to migrate a VSAN
cluster from vSS to vDS
I am
sure there some of you that is currently a VSAN cluster in some shape or form
either in POC, Development or Production environment. It provides a cost effective solution that is
great for remote offices or even management clusters and can be implemented and
managed very easily but as the saying goes nothing ever come easy and you have
to work for it. The same goes here and
there are a lot of prerequisites for a VSAN environment that is crucial for implementing
a healthy system that performs to its full potential. I will not go into much detail here and feel
free to contact us if any services are required.
One
of the recommendations for VSAN is to use a vDS and your VSAN license actually
includes the ability to use vDS which allows you as our customer to take
advantage of simplified network management regardless of the underlying vSphere
edition.
If
you upgrade from vSS to vDS the steps are a bit different that your normal migration. I recommend you put the host into maintenance
mode with ensure accessibility. Verify
the uplink used for VSAN VMkernel and use the manage physical network adapter
to remove the vmnic from vSS and to add it to vDS. Now migrate the VMkernel to
the VDS. If you review the VSAN health
the network will show failed.
 To
verify multicast network traffic is flowing from you host use the following
command on the ESXi host using bash shell:
To
verify multicast network traffic is flowing from you host use the following
command on the ESXi host using bash shell:
#tcpdump-uw -i vmk2 -n -s0 -t -c 20 udp port 23451 or ump
port 12345
To
review your multicast network settings
#esxcli vsan network list
Ruby
vSphere Console (RVC) is also a great tool to have in your arsenal for managing
VSAN and following command can be used to review the VSAN state:
vsan.check_state <cluster>
To
re-establish the network connection you can use the following command:
vsan.reapply_vsan_vmknic_config <host>
Rerun
the VSAN health test and verify Network shows passed.
Now
that the VSAN network is up and running you can migrate the rest of VMkernels.
Monday, August 1, 2016
VSAN - on-disk upgrade error "Failed to realign following Virtual SAN objects"
I upgraded the ESXi hosts from 6.0 GA to 6.0U2 and selected upgrade for VSAN On-disk format Version, however this failed with following error message:
"Failed to realign following Virtual SAN objects: XXXXX, due to object locked or lack of vmdk descriptor file, which requires manual fix"

I reviews the VSAN health log files at following location:
/storage/log/vmware/vsan-health/vmware-vsan-health-service.log
Grep realigned

Grep Failed

I was aware of this issue due to previous blog posts on same problem and new of KB 2144881 which made the task of cleaning objects with missing descriptor files much easier.
I ran the script: python VsanRealign.py -l /tmp/vsanrealign.log precheck.
I however received another alert and the python script did not behave as it should with it indicating a swap file had either multiple reverences or was not found.

I then used RVC to review the object info for the UUID in question.

I used RVC again to try and purge any inaccessible swap files:
vsan.purge_inaccessible_vswp_objects ~cluster
no objects was found.
I then proceeded to review the vmx files for the problem VM in question and found reference to only the original *.vswp file and not with additional extension of *.vswp.41796
Every VM on VSAN has 3 swap files:
vmx-servername*.vswp
servername*.vswp
sername*.vswp.lck
I figured this servername*.vswp.41796 is just a leftover file and bear no reference to the VM and this is what is causing the on-disk upgrade to fail.
I proceeded to move the file to my /tmp directory (Please be very careful with delete/moving any files within a VM folder, this is done at your own risk and if you are not sure I highly recommend you contact VMware support for assistance)
I ran the python realign script again. This time I received a prompt to perform the autofix actions to remove this same object in question for which i selected yes.

I ran the on-disk upgrade again and it succeeded.
Even though VMware provides a great python script that will in most instance help you clean up the VSAN disk groups, there are times when this will not work as planned and then you just have to a bit more troubleshooting and perhaps a phone call to GSS.
links:
https://kb.vmware.com/selfservice/microsites/search.do?language=en_US&cmd=displayKC&externalId=2144881
"Failed to realign following Virtual SAN objects: XXXXX, due to object locked or lack of vmdk descriptor file, which requires manual fix"
I reviews the VSAN health log files at following location:
/storage/log/vmware/vsan-health/vmware-vsan-health-service.log
Grep realigned

Grep Failed

I was aware of this issue due to previous blog posts on same problem and new of KB 2144881 which made the task of cleaning objects with missing descriptor files much easier.
I ran the script: python VsanRealign.py -l /tmp/vsanrealign.log precheck.
I however received another alert and the python script did not behave as it should with it indicating a swap file had either multiple reverences or was not found.

I then used RVC to review the object info for the UUID in question.

I used RVC again to try and purge any inaccessible swap files:
vsan.purge_inaccessible_vswp_objects ~cluster
no objects was found.
I then proceeded to review the vmx files for the problem VM in question and found reference to only the original *.vswp file and not with additional extension of *.vswp.41796
Every VM on VSAN has 3 swap files:
vmx-servername*.vswp
servername*.vswp
sername*.vswp.lck
I figured this servername*.vswp.41796 is just a leftover file and bear no reference to the VM and this is what is causing the on-disk upgrade to fail.
I proceeded to move the file to my /tmp directory (Please be very careful with delete/moving any files within a VM folder, this is done at your own risk and if you are not sure I highly recommend you contact VMware support for assistance)
I ran the python realign script again. This time I received a prompt to perform the autofix actions to remove this same object in question for which i selected yes.

I ran the on-disk upgrade again and it succeeded.
Even though VMware provides a great python script that will in most instance help you clean up the VSAN disk groups, there are times when this will not work as planned and then you just have to a bit more troubleshooting and perhaps a phone call to GSS.
links:
https://kb.vmware.com/selfservice/microsites/search.do?language=en_US&cmd=displayKC&externalId=2144881
VSAN - cache disk unavailable when creating disk group on Dell
I ran into an issue at customer where the SSD which is to be used as the cache disk on the VSAN disk group was showing up as regular HDD. However when I reviewed the storage device the disk is visible and is marked as flash...weird. So what is going on here.
As I found out this due to a flash device being used with a controller that does not support JBOD.
To fix this I had to create a RAID 0 virtual disk for the SSD. If you have a Dell controller this means you have to set the mode to RAID but make sure that all your regular HDDs to be used in the disk group is set to non-raid! Once host is back online you have to go and mark the SSD drive as flash. This is the little "F" icon in the disk devices.
This environment was configured with all the necessary VSAN prerequisites for Dell in place, you can review this on the following blog post:
http://virtualrealization.blogspot.com/2016/07/vsan-and-dell-poweredge-servers.html
Steps to setup RAID-0 on SSD through lifecycle controller:
After ESXi host is online again then you have to change the Disk to flash. This is due to RAID abstracting away most of the physical device characteristics and the media type as well.
As I found out this due to a flash device being used with a controller that does not support JBOD.
To fix this I had to create a RAID 0 virtual disk for the SSD. If you have a Dell controller this means you have to set the mode to RAID but make sure that all your regular HDDs to be used in the disk group is set to non-raid! Once host is back online you have to go and mark the SSD drive as flash. This is the little "F" icon in the disk devices.
This environment was configured with all the necessary VSAN prerequisites for Dell in place, you can review this on the following blog post:
http://virtualrealization.blogspot.com/2016/07/vsan-and-dell-poweredge-servers.html
Steps to setup RAID-0 on SSD through lifecycle controller:
- Lifecycle Controller

- System Setup
- Advanced hardware configuration

- device settings

- Select controller (PERC)

- Physical disk management

- Select SSD

- From drop down select “convert to Raid capable”

- Go back to home screen
- Select hardware configuration
- Configuration wizard

- Select RAID configuration

- Select controller

- Select Disk to convert from HBA to RAID (if required)

- Select RAID-0

- Select Physical disks (SSD in this case)

- Select Disk attribute and name Virtual Disk.

- Finish
- Reboot


After ESXi host is online again then you have to change the Disk to flash. This is due to RAID abstracting away most of the physical device characteristics and the media type as well.
- Select ESXi host
- Manage -> Storage -> Storage adapters
- Select vmhba0 from PERC controller
- Select the SSD disk
- Click on the "F" icon above.
VSAN - Changing Dell Controller from RAID to HBA mode
So had to recently make some changes for customer to set the PERC controller to HBA (non-raid), since previously it was configured with RAID mode and all disks was in RAID 0 virtual disks. Each disk group consists of 5 disks with 1 x SSD and 4 x HDD.
I cannot overstate this but make sure you have all the firmware and drivers up to date which is provided in the HCL.
Here are some prerequisites for moving from RAID to HBA mode: I am not going to get into details for performing these tasks.
I followed these steps:
I cannot overstate this but make sure you have all the firmware and drivers up to date which is provided in the HCL.
Here are some prerequisites for moving from RAID to HBA mode: I am not going to get into details for performing these tasks.
- All virtual disks must be removed or deleted.
- Hot spare disks must be removed or re-purposed.
- All foreign configurations must be cleared or removed.
- All physical disks in a failed state, must be removed.
- Any local security key associated with SEDs must be deleted.
I followed these steps:
- Put host into maintenance mode with full data migration. Have to select full data migration since we will be deleting the disk group.
- This process can be monitored in RVC using command vsan.resync_dashboard ~cluster
- Delete the VSAN disk group on the host in maintenance.
- Use the virtual console on iDRAC and select boot next time into lifecycle controller
- Reboot the host
- From LifeCycle Controller main menu

- System Setup
- Advanced hardware configuration

- Device Settings

- Select controller card
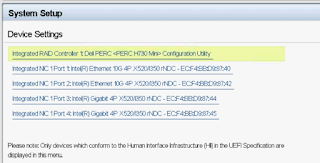
- Select Controller management

- Scroll down and select Advanced controller management

- Set Disk Cache for Non-RAID to Disable
- Set Non RAID Disk Mode to Enabled


Friday, July 22, 2016
WinSCP connection to VCSA failed: "Received too large SFTP packet. Max supported packet size is 1024000 B"
The following error might appear when you try to connect with WinSCP to your VCSA.

This is due to login scripts that are printing words and the first 4 characters cast into the number(represents the first 4 bytes read from the server)
To fix the problem you can usually move the command that print the login script text to another proper interactive script or just remove completed, however in VMware the scenario is different and the default shell has change from bash to appliancesh.
VMware's resolution is to use the SCP file protocol through bash shell. However after I change to SCP I received the following error: (when default shell not set to bash)


This was fixed after changing the default shell. I am using a newly created user account that can be used to access the server through WinSCP. Just remember you would have to modify permissions on your files to copy them if going down this route. You can use root account to temporary change the shell from bash to appliance to access with WinSCP. Entirely up to you.
>shell.set --enabled True
>shell
>useradd winscp
>passwd winscp
>visudo (add user with root access)
>chsh -s /bin/bash winscp
If you are using root you temporary change to bash shell and then return to appliance shell:
To return:
>chsh -s /bin/appliancesh useraccount
Links:
https://kb.vmware.com/selfservice/microsites/search.do?language=en_US&cmd=displayKC&externalId=2107727
https://kb.vmware.com/selfservice/microsites/search.do?language=en_US&cmd=displayKC&externalId=2115983
https://winscp.net/eng/docs/message_large_packet
Thursday, July 21, 2016
VSAN - migrate VSAN cluster to new vCenter Server
I had to recently perform a VSAN cluster migration from one vCenter Server to another. This sounds like a daunting task but ended up being very simple and straight forward due to VSAN's architecture to not have a reliance on vCenter Server for its normal operation(nice on VMware!) As a bonus the VMs does not need to be powered off or loose any connectivity.(bonus!)
Steps to perform:
- Deploy a new vCenter Server and create a vSphere Cluster
- Enable VSAN on the cluster.
- Install VSAN license and associate to cluster
- Disconnect one of the ESXi hosts from your existing VSAN Cluster
- Add previously disconnected Host to the new VSAN Cluster on your new vCenter Server.
- You will get a warning within the VSAN Configuration page stating there is a "Misconfiguration detected". this is normal due to the ESXi not being able to communicate with the other hosts in the cluster it was configured with.
- Add the rest of the ESXi hosts.
- After all the ESXi are added back the warning should disappear.
links:
VSAN upgrade - Dell Poweredge servers
I have been meaning to write up on a VSAN upgrade on a Dell R730xd's with PERC H730 which I recently completed at a customer. This is not going to be lengthy discussion on this topic but primarily want to provide some information on tasks I had to perform for upgrade to VSAN 6.2
Ran into some serious trouble and had a resync task that ran for over a week due to a VSAN 6.0 KB 2141386 which appears on heavy utilization storage utilization. Only way to fix this was to put host into maintenance mode with full data migration, destroy and recreate the disk group.
Also ALWAYS check the VMware HCL to make sure your firmware is compatible. I can never say this enough since it is super important.
This particular VSAN 6.0 was running with outdated firmware for both backplane and PERC H730. Also found that controller was set to RAID for disks in stead of non-raid (passthrough or HBA mode).
Links:
VMware as a kick@ass KB on best practices for Dell PERC H730 for VSAN implementation. Link provide below.
https://kb.vmware.com/selfservice/microsites/search.do?language=en_US&cmd=displayKC&externalId=2109665
https://kb.vmware.com/selfservice/microsites/search.do?language=en_US&cmd=displayKC&externalId=2144614
https://kb.vmware.com/selfservice/microsites/search.do?language=en_US&cmd=displayKC&externalId=2144936
https://kb.vmware.com/selfservice/microsites/search.do?language=en_US&cmd=displayKC&externalId=2141386
- The VSAN on-disk metadata upgrade is equivalent to doing a SAN array firmware upgrade and therefore requires a good backup and recovery strategy to be in place before you proceed.
- Migrate VM’s off of host.
- Place host into maintenance mode.
- You want to use whatever the quickest method is to update the firmware, for VSAN's sake. Normally Dell FTP update if network available to configure.
- When you put a host into maintenance mode and choose the option to "ensure accessibility", it doesn't migrate all the components off but just enough so that the policies will be in violation. A timer starts when you power it off, and if the host isn't back in the VSAN cluster after 60 minutes, it begins to rebuild that host's data elsewhere in the cluster If you know it will take longer than 60min or where possible select full data migration.
- You can view the resync using the RVC command "vsan.resync_dashboard <cluster/host>"
- Change advanced settings required for PERC H730
- https://kb.vmware.com/selfservice/microsites/search.do?language=en_US&cmd=displayKC&externalId=2144936
- esxcfg-advcfg -s 100000 /LSOM/diskIoTimeout
- esxcfg-advcfg -s 4 /LSOM/diskIoRetryFactor
- Upgrade the lsi_mr3 driver. VUM is easy!
- Login to DRAC and perform firmware upgrade:
- Upgrade Backplane expander (BP13G+EXP 0:1)
- Firmware version 1.09 -> 3.03
- Upgrade DRAC H730 version
- 25.3.0.0016 -> 25.4.0.0017
- Login to lifecycle controller and set/verify BIOS configuration settings for controller
- https://elgwhoppo.com/2015/08/27/how-to-configure-perc-h730-raid-cards-for-vmware-vsan/
- Disk cache for non-raid = disabled
- Bios mode = pause on errors
- Controller mode = HBA (non-raid)
- After all hosts upgraded, verify VSAN cluster functionality and other prerequisites:
- Verify no stranded objects on VSAN datastores by running python script on each host.
- Verify persistent log storage for VSAN trace files.
- Verify advanced settings still set from task 3!
- Place each host into maintenance mode again.
- Upgrade ESXi host to 6.0U2.
- Upgrade the on-disk format to V3.
- This task runs for a very long time and has alot of sub-steps which takes place in the background. It also migrates the data off of each disk group to recreate as V3 . This has not impact on the VMs.
- This process is repeated for all disk groups.
- Verify all disk groups upgrade to V3.
- Completed
Ran into some serious trouble and had a resync task that ran for over a week due to a VSAN 6.0 KB 2141386 which appears on heavy utilization storage utilization. Only way to fix this was to put host into maintenance mode with full data migration, destroy and recreate the disk group.
Also ALWAYS check the VMware HCL to make sure your firmware is compatible. I can never say this enough since it is super important.
This particular VSAN 6.0 was running with outdated firmware for both backplane and PERC H730. Also found that controller was set to RAID for disks in stead of non-raid (passthrough or HBA mode).
Links:
VMware as a kick@ass KB on best practices for Dell PERC H730 for VSAN implementation. Link provide below.
https://kb.vmware.com/selfservice/microsites/search.do?language=en_US&cmd=displayKC&externalId=2109665
https://kb.vmware.com/selfservice/microsites/search.do?language=en_US&cmd=displayKC&externalId=2144614
https://kb.vmware.com/selfservice/microsites/search.do?language=en_US&cmd=displayKC&externalId=2144936
https://kb.vmware.com/selfservice/microsites/search.do?language=en_US&cmd=displayKC&externalId=2141386
VSAN upgrade - prerequisites
This is just my list of prerequisites for a VSAN upgrade. Most of these items are applicable to a new install as well but more focused on a upgrade.
Please feel free to provide feedback and would to add to my list with your experiences.
Prerequisites:
Please feel free to provide feedback and would to add to my list with your experiences.
Prerequisites:
- The VSAN on-disk metadata upgrade is equivalent to doing a SAN array firmware upgrade and therefore requires a good backup and recovery strategy to be in place before we can proceed.
- Enough resources => 3 node cluster!
- If 3 or less node cluster then unable to evacuate the disk groups
- Run RVC command: > vsan.ondisk_upgrade –allow-reduced-redundancy
- Requirement of 6 GB of RAM inside a host with 6.0U2 running VSAN. (for lab environment)
- Each host should contain a minimum of 32 GB of memory to accommodate for the maximum number of 5 disk groups and maximum number of 7 capacity devices per disk group.
- Verify no stranded objects on VSAN datastores before disk format upgrade.
- VM swap object left behind
- Locked CBT file
- Broken snapshot disk chain
- Run python SCRIPT to find and fix stranded objects.
- 2144881_VsanRealign
- https://kb.vmware.com/selfservice/microsites/search.do?language=en_US&cmd=displayKC&externalId=2144881
- Verify the storage controller on the host is compatible
- Verify the storage controller is set to pass-through or HBA mode for RAID.
- Verify the storage controller has caching disabled.
- Open VMWARE HCL and verify that your firmware is up date for all server components.
- Persistent logging folder for VSAN trace file and rest (USB or SD-card ESXi install)
- http://cormachogan.com/2015/02/24/vsan-considerations-when-booting-from-usbsd/
- http://cormachogan.com/2015/08/14/handling-vsan-trace-files-when-esxi-boots-from-a-flash-device/
- I do recommend you install vRealize Log insight for syslog collection, after all its free for up to 25 OSI)
- Networking:
- Hybrid requires at least 1 x 1GB connection
- Flash requires at least 1 x 10GB connection
- Layer 2 multicast must be enabled on the physical switch
- Each ESXi host in the cluster must have a vmkernel port
Links:
Monday, July 18, 2016

Subscribe to:
Posts (Atom)